Interface graphique
Jusqu'à présent, nous avons conçu des scripts Python qui affichent leur résultat en mode texte. Ce chapitre va nous permettre de nous familiariser avec la création de fenêtres graphiques proposant une interaction plus riche avec l'utilisateur.
Le module Tkinter
Ce module, préinstallé avec Python, permet de concevoir une interface graphique.
L'avantage de Tkinter par rapport à d'autres modules simlaires est qu'il
est disponible sur les plateformes les plus courantes (Windows, macOS, Linux, Raspberry Pi).
En guise d'exemple, nous allons concevoir une version graphique de notre programme de calcul d'IMC.
Création de l'interface graphique
from tkinter import *

# Création d'une nouvelle fenêtre
window = Tk()

# Titre de la fenêtre
window.title("Calcul d'IMC")
Une fois la fenêtre de l'application créee, on peut lui ajouter des composants d'interface
graphique (boutons, champs de saisie, images, etc). La fonction Label
permet d'associer un libellé texte à la fenêtre window. Celui-ci est inséré
dans l'interface avec la méthode pack(). Par défaut, les éléménts s'organisent
verticallement de haut en bas.
weightLabel = Label(window, text="Poids (kg)")
weightLabel.pack()
La fonction Entry() crée un champ de saisie. Elle utilise un chaîne de caractères
variable (StringVar) de sorte que lorsque l'utilisateur saisira une nouvelle valeur, le contenu
de la variable weight sera modifié en conséquence.
weight = StringVar()
weight.set("Saisissez votre poids...")

weightInput = Entry(window, textvariable=weight, width=30)
weightInput.pack()
Exercice
Complétez le script afin d'ajouter un champ de saisie pour la taille.
from tkinter import *

window = Tk()
window.title("Calcul d'IMC")

weightLabel = Label(window, text="Poids (kg)")
weightLabel.pack()

weight = StringVar()
weight.set("Saisissez votre poids...")

weightInput = Entry(window, textvariable=weight, width=30)
weightInput.pack()

heightLabel = Label(window, text="Taille (m)")
heightLabel.pack()

height = StringVar()
height.set("Saisissez votre taille...")

heightInput = Entry(window, textvariable=height, width=30)
heightInput.pack()
Enfin, on ajoute un dernier libellé texte qui servira à afficher la valeur de l'IMC issue du calcul et un bouton qui déclenchera le calcul.
imcLabel = Label(window, text="IMC =")
imcLabel.pack()

computeButton = Button(window, text="CALCULER", width=8)
computeButton.pack()
Programmation événementielle
Une interface graphique repose sur le principe de la programmation événementielle : c'est à dire qu'une
fois créee, elle entre dans un mode d'attente d'événements (clic de bouton, modification d'un champ de
saisie) grâce à la méthode mainloop().
window.mainloop()
Il possible d'associer une action à un événement précis par l'intermédiaire de la propriété command.
Pour notre application, on définit une nouvelle fonction computeIMC() associée au bouton
computeButton
imcLabel = Label(window, text="IMC =")
imcLabel.pack()
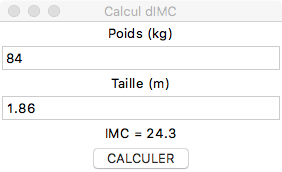
def computeIMC():
global weight, height, imcLabel
# Récupération des valeurs renseignées
# dans les deux champs de saisie
w = float(weight.get())
h = float(height.get())
# Calcul de l'IMC (arrondi à un chiffre après la virgule)
imc = round(w/(h*h), 1)
# Mise à jour du texte du libellé imcLabel
imcLabel.configure(text="IMC = " + str(imc))
computeButton = Button(window, text='CALCULER', width=8, command=computeIMC)
computeButton.pack()
window.mainloop()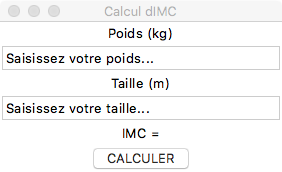
Exercice
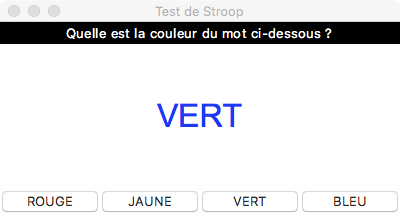
Écrivez un script stroop.py qui réalise un
test de Stroop en affichant successivement
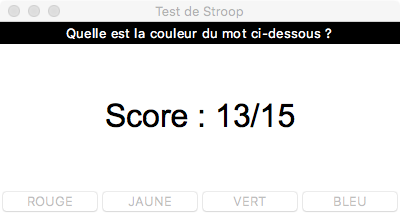
15 mots dans une couleur donnée. L'application affichera en suite le nombre
de bonnes réponses, ainsi que le temps de chaque réponse.
stroop.pyfrom tkinter import *
from time import *
from random import *
window = Tk()
window.title('Test de Stroop')
score = 0
iteration = 0
maxIteration = 15
responseTime = []
referenceTime = 0
word = ['ROUGE', 'JAUNE', 'VERT', 'BLEU']
color = ['red', 'yellow', 'green', 'blue']
tipLabel = Label(window, text='Quelle est la couleur du mot ci-dessous ?',
fg='white', bg='black')
tipLabel.pack(fill=X)
colorLabel = Label(window, text=word[randrange(4)],
fg=color[randrange(4)], font=('Arial', 32))
colorLabel.pack(padx=50, pady=50)
def chooseRed():
global colorLabel, score
if colorLabel.cget('fg') == 'red':
score = score + 1
print(score)
nextWord()
redButton = Button(window, text='ROUGE', width=8, command=chooseRed)
redButton.pack(side=LEFT)
def chooseYellow():
global colorLabel, score
if colorLabel.cget('fg') == 'yellow':
score = score + 1
print(score)
nextWord()
yellowButton = Button(window, text='JAUNE', width=8, command=chooseYellow)
yellowButton.pack(side=LEFT)
def chooseGreen():
global colorLabel, score
if colorLabel.cget('fg') == 'green':
score = score + 1
print(score)
nextWord()
greenButton = Button(window, text='VERT', width=8, command=chooseGreen)
greenButton.pack(side=LEFT)
def chooseBlue():
global colorLabel, score
if colorLabel.cget('foreground') == 'blue':
score = score + 1
print(score)
nextWord()
blueButton = Button(window, text='BLEU', width=8, command=chooseBlue)
blueButton.pack(side=LEFT)
def nextWord():
global color, word, colorLabel,
responseTime, referenceTime,
iteration, maxIteration
iteration = iteration + 1
if iteration<maxIteration:
colorLabel.configure(text=word[randrange(4)],fg=color[randrange(4)])
responseTime.append(time()-referenceTime)
referenceTime = time()
else:
message='Score : '+str(score)+'/'+str(maxIteration)
colorLabel.configure(text=message,fg='black')
redButton.configure(state=DISABLED)
yellowButton.configure(state=DISABLED)
greenButton.configure(state=DISABLED)
blueButton.configure(state=DISABLED)
print(responseTime)
referenceTime = time()
window.mainloop()